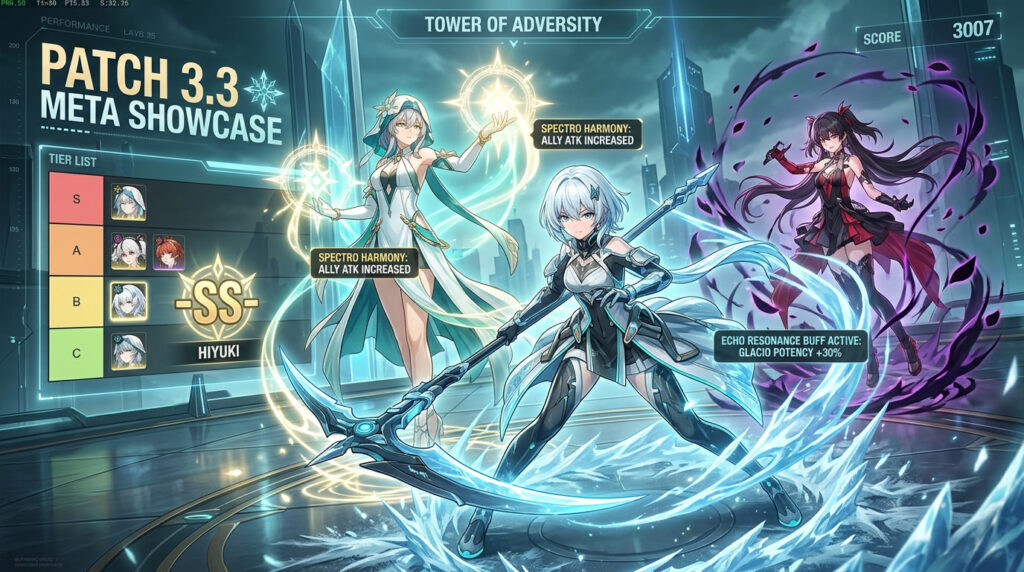
Wuthering Waves (WUWA) · Patch 3.3 · 2026
If your team compositions were built around the v3.2 Spectro/Havoc dual-carry structure,
they are now obsolete in the upper floors of the Tower of Adversity. Version 3.3 introduced
Hiyuki, a Glacio Main DPS that doesn’t just join the meta—she restructures it.
Her Echo Resonance Buff interactions scale off concerto energy loops that the
existing Glacio roster simply couldn’t access before. This guide gives you unambiguous pull
decisions, a definitive tier list, and full SS-tier build breakdowns so you walk into 2026
endgame with a plan, not a guess.
⚠ v3.2 top-tier Spectro compositions drop from ToA Floor 6 clears to Floor 4–5 without active support. This is a real power shift.
◈ 3.3 Banner Analysis: Pull or Skip
Two banners define the tier list wuwa 2026 window. Your pull decision should be
based on roster gap, not hype. Here’s the direct breakdown.
Hiyuki
Glacio · Main DPS · Phase 1 & 2
PULL
- Best Glacio DPS ever printed. No caveat.
- Her Resonance Liberation triggers a unique Echo Resonance Buff stack mechanic that multiplies off Glacio teammates’ concerto rates.
- Future-proof: 3.4 leaks suggest Glacio support units built specifically around her kit.
- ToA Floor 6 clears are significantly faster with her than any current alternative on Glacio-weak floors.
- Skip if: You own Jiyan (Aero) or Camellya (Havoc) at S6 and clear ToA Floor 6 comfortably already.
Denia
Fusion · Sub-DPS · Phase 2
CONDITIONAL
- Strong, not mandatory. Denia outperforms Mortefi in sustained off-field Fusion damage by roughly 18–22% in controlled sims.
- Her value is entirely dependent on your Fusion carry: pairs excellently with Encore and Chixia; mediocre with others.
- Denia vs Mortefi verdict: pull Denia only if you’re running an Encore-main team. Mortefi’s off-field plunge window still synergizes better with Jiyan teams.
- Not a meta-defining unit. ToA clears don’t require her.
💡 Astrite Economy Note
If you’re F2P or low-spending, prioritize Hiyuki on Phase 1. Denia’s Phase 2 banner overlaps with a
login event that typically distributes 1,600–2,000 Astrite, giving you a partial refund window even
if you chase both.
◈ Wuwa Tier List 3.3 — Full Resonator Rankings
Rankings reflect Tower of Adversity Floor 5–6 performance at S0 (no Sequence Nodes)
unless noted. Weapon assumptions: 4-star accessible options for S-tier and below; signature weapon
noted separately for SS. Role tags are binding—a character listed as Sub-DPS cannot replace a Main DPS
slot without significant damage loss.
SS
Mandatory Meta — Floor 6 Gatekeepers
These units clear the hardest ToA content faster than any alternative. No debate.
#1
The defining unit of 3.3. Hiyuki’s Frostbrand Liberation applies a permanent Glacio Resonance mark that interacts with every Glacio sub-DPS and support on the roster. Her Echo Resonance Buff window lasts 12 seconds and resets on kill—making her uniquely suited to ToA’s multi-wave format where other carries lose uptime between spawns. At S0 with signature weapon she’s the highest single-target DPS in the game. At S0 with a 4-star weapon she still lands comfortably above the previous SS-tier ceiling.
Strengths
- Highest Glacio DPS output ever
- Self-contained liberation loop
- Kill-reset mechanic = ToA-optimized
- Strong at S0; scales steeply with sequences
Weaknesses
- Demands Glacio-weak enemy floors to peak
- Sub-optimal on Glacio-immune ToA floors
- Needs Shorekeeper support to fully loop liberation
#2
The Shorekeeper vs Verina 2026 debate ended in 3.1 and 3.3 doesn’t reopen it.
Shorekeeper’s coordinated attack buff interacts with Hiyuki’s Echo Resonance Buff to create
a 28–34% team damage multiplier that Verina cannot match. Her Spectro Frazzle
application also procs a separate damage instance off Hiyuki’s Frostbrand marks.
If you pull Hiyuki, you pull for Shorekeeper first.
Strengths
- Best healer and buffer simultaneously
- Frazzle application adds free damage layer
- Universal fit across all team archetypes
Weaknesses
- Hard to obtain if missed previous banners
- Wasted if running mono-element teams without Spectro carry
#3
Drops from #1 to #3 in the Wuwa tier list 3.3 ranking—not
because her kit changed, but because Hiyuki’s ceiling is simply higher on new floors.
Camellya still clears ToA Floor 6 comfortably and remains the best option on
Glacio-immune floors. Her Aemeath synergy guide remains the strongest
non-Shorekeeper support pairing for Havoc compositions.
Strengths
- Highest AoE Havoc damage in the game
- Dominant on Glacio-immune ToA floors
- Camellya + Aemeath remains best Havoc duo
Weaknesses
- No longer top of the single-target leaderboard
- Liberation downtime hurts on fast-kill floors
S
Top Tier — Floor 5–6 Viable
Clears all endgame content; not mandatory but significantly better than alternatives.
#4
Still the best Aero carry and Floor 6 viable with the right team. His limitation in 3.3 is Denia’s failure to slot into his optimal sub-DPS position—Mortefi remains his better partner despite the new Fusion unit. Jiyan clears remain fast, but the Hiyuki power gap on Glacio floors is undeniable at high investment levels.
#5
The best Havoc-specific support in the game. The Aemeath synergy guide principle hasn’t changed in 3.3: pair with Camellya, stack Havoc Deepen, and rotate out fast. Her value drops to A-tier in non-Havoc teams because her kit is element-locked. In the correct composition she is an SS-tier unit wearing S-tier clothes.
#6
Shorekeeper vs Verina 2026: Verina is still the best free-to-obtain healer and remains mandatory for players without Shorekeeper. Her ATK% buff is competitive; her healing is comparable. The gap is Shorekeeper’s Frazzle + coordinated attack combo, which Verina simply doesn’t have. If you own Shorekeeper, Verina benches. If you don’t, she’s S-tier.
#7
Denia vs Mortefi: Denia wins in raw sustained off-field output but her coordinated attack triggers are tied to concerto timing that only Encore’s kit syncs with naturally. On Encore teams: S-tier Sub-DPS. On Jiyan teams: A-tier at best. Mortefi doesn’t get displaced from his niche by Denia—they serve different carry pairings.
A
Strong Roster Pieces — Floor 4–5 Optimal
Valuable, sometimes replaceable. Context-dependent strength.
#8
A-tier only because Denia now exists. In a Jiyan team with no Denia he is effectively S-tier—the plunge window coordination with Jiyan’s heavy attacks is not replicated by any other unit. Don’t bench him unless you have Denia and a Denia-syncing carry.
#9
Drops to A-tier not from kit degradation but from floor composition in 3.3 ToA. Glacio-weak floors now exist at a ratio that reduces Fusion carry uptime. Still one of the best 4-star-friendly carries in the game and Denia’s ideal partner if you’re rebuilding a Fusion team.
#10
Rises to high A-tier in 3.3 specifically because Hiyuki teams want a Glacio sub-support when running without Shorekeeper. Baizhi’s concerto generation is the cleanest alternative. She won’t reach Shorekeeper’s buff ceiling, but she makes Hiyuki’s liberation loop functional for players without the premium support.
◈ Wuwa SS-Tier Build Breakdowns
Optimal builds for every SS-tier unit at S0, targeting Tower of Adversity Floor 6.
Weapon alternatives are listed for players without the signature.
Hiyuki
Glacio
Main DPS Build
| Slot |
Best Echo Set |
Main / Sub Stats Priority |
Best Team Synergy |
| Primary Echo |
Frostbound Sovereign |
Glacio DMG% (Main)CRIT Rate / DMG |
ShorekeeperBaizhi |
| Echo Set Bonus |
5-pc Frostbound Sovereign |
4-set: +40% Glacio Resonance Buff duration |
Extends Frostbrand Liberation window for kill-reset |
| Weapon (Sig) |
Absolute Zero — Glacio DMG%, CRIT DMG sub; Liberation DMG bonus on proc |
+18–22% liberation damage over alternatives |
| Weapon (Alt) |
Emerald of Genesis (4★) — Energy Regen%, ATK% sub; enables reliable liberation loop |
Viable to 90% of signature performance with correct substats |
| Stat Priority |
CRIT Rate ≥ 65%
CRIT DMG ≥ 140%
Glacio DMG%
ATK%
Energy Regen ≥ 130%
|
Shorekeeper
Spectro
Support Build
| Slot |
Best Echo Set |
Main / Sub Stats Priority |
Best Team Synergy |
| Primary Echo |
Rejuvenating Glow |
Healing Bonus% (Main)Energy Regen |
HiyukiCamellyaJiyan |
| Echo Set Bonus |
5-pc Rejuvenating Glow |
4-set: +10% team ATK after healing, 20% coordination buff |
Passive buff stacks with Shorekeeper’s coordinated attack |
| Weapon (Sig) |
Stellar Symphony — Energy Regen% main; team Resonance Skill DMG bonus on concerto |
Reduces liberation cooldown by 1.5s effectively in practice |
| Weapon (Alt) |
Variation (4★) — Energy Regen%; easiest concerto loop weapon at accessible rarity |
72–78% of signature value; recommended for F2P |
| Stat Priority |
Energy Regen ≥ 165%
Healing Bonus%
HP%
Flat HP
|
Camellya
Havoc
Main DPS Build
| Slot |
Best Echo Set |
Main / Sub Stats Priority |
Best Team Synergy |
| Primary Echo |
Sun-sinking Eclipse |
Havoc DMG% (Main)CRIT Rate/DMG |
AemeathShorekeeper |
| Echo Set Bonus |
5-pc Sun-sinking Eclipse |
4-set: +10% Havoc Deepen per stack, 3 stacks maximum |
Aemeath applies Havoc Deepen synergy passively off-field |
| Weapon (Sig) |
Ages of Harvest — CRIT DMG sub; Havoc Deepen amplifier on heavy attack |
Best with Aemeath — heavy attack windows align perfectly |
| Weapon (Alt) |
Lustrous Razor (4★) — ATK%; covers Camellya’s weakest stat without signature |
80–85% of signature output at S0 with correct echo substats |
| Stat Priority |
CRIT Rate ≥ 60%
CRIT DMG ≥ 160%
Havoc DMG%
ATK%
|
◈ Tower of Adversity Best Teams 3.3
These are the Tower of Adversity best teams 3.3 compositions sorted by clear speed
on Floors 5–6. Team slot three is the flex position—options listed in priority order.
Frostbrand Core (Glacio-weak floors)
S-Rank Clear
+
+
Baizhi / Zhezhi
Glacio Sub / Support
Havoc Deepen Stack (universal floors)
S-Rank Clear
+
+
Shorekeeper / Verina
Healer/Buffer
Aero Plunge (Aero-weak floors)
A-Rank Clear
+
+
Verina / Shorekeeper
Healer
Fusion Burst (Encore + Denia, Fusion-weak floors)
A-Rank Clear
⛔ What Not to Run in 3.3
Rover (Havoc) as primary DPS on Floor 6 is no longer viable without S6 sequences—powercreep from Camellya at equivalent investment is too large.
Lingyang drops to B-tier: his Glacio compositions lost their support niche entirely to Hiyuki’s new Baizhi synergy axis.
Calcharo remains floor-5 viable but his ToA Floor 6 clear times are now 40–55% slower than the SS-tier ceiling.
◈ Denia vs Mortefi: The Full Breakdown
This is the most-asked comparison in 3.3 and the answer is team-dependent. Here’s the breakdown
across the three carry pairings where it matters.
| Carry Partner |
Denia Performance |
Mortefi Performance |
Verdict |
| Encore |
+22% over Mortefi |
Concerto timing misaligns |
Denia |
| Jiyan |
Coordination window missed |
+15% over Denia |
Mortefi |
| Chixia |
+11% over Mortefi |
Functional but suboptimal |
Denia |
| Hiyuki (off-element) |
Marginal difference |
Marginal difference |
Run Glacio sub instead |
Wuwa tier list conclusion is clear: Denia vs Mortefi is not a global ranking question—it’s a carry-specific question.
Don’t pull Denia if Jiyan is your primary Tower carry. Pull Denia if Encore is. Mortefi is a
4-star unit you already have access to via standard banner; Denia costs pulls. The math needs
to justify the cost before you commit.
For players exploring other competitive game systems alongside wuwa tier list, the optimization mindset
here—matching support kits to carry mechanics rather than chasing raw numbers—applies equally
to NIKKE tier list meta analysis
and similar gacha endgame structures. The complete gacha games list
gives broader context on how each game handles the support-carry investment curve differently.
For players who want a break from gacha optimization and prefer direct skill expression,
the best single-player PC games of 2026
and current triple-A releases
are worth checking. And if you’re tracking the broader competitive scene,
the best game developer studios
analysis covers Kuro Games’ production trajectory and what it signals for 3.4 content.