“You don’t fight Crow. You just decide how long it takes him to kill you.”
Let’s be clear about something. While the meta churns — tanks rise, snipers fall, new brawlers drop every season — Crow remains a permanent fixture in high-level play for one reason most players miss entirely: he doesn’t just deal damage. He controls the biological clock of every enemy on the map.
Crow’s identity is built on two pillars that most assassins simply don’t have:
Anti-Healer: Every single dagger application resets the enemy’s auto-regen timer. In a meta saturated with high-HP bruisers and sustain-heavy brawlers like Ash, Frank, and Chuck, the ability to keep an opponent perpetually “bleeding” is a strategic force multiplier that no damage number captures. A Crow hovering at range isn’t playing passively — he’s conducting attrition warfare.
Crowd Controller: His Super isn’t just an escape tool or an engage. It’s a zone denial device. Landing it on a cluster in Gem Grab or on a ball carrier in Brawl Ball doesn’t need to secure a kill to win the exchange. The slowing daggers force repositioning, interrupt pushes, and create windows for teammates. This is why Crow scales harder in coordinated play than his raw stat sheet suggests.
Crow is often compared to Leon as a fellow Legendary assassin — but where Leon relies on invisibility to close distance, Crow wins through biological attrition. Two completely different threat philosophies. Similarly, Cordelius operates as a Legendary assassin through realm isolation, while Crow doesn’t need to trap you anywhere. He just needs to touch you once.
The brawlers who beat him are brawlers that close distance instantly and burst before poison matters — Maisie, Draco, Kenji at close quarters. Everything else? Crow eats for free.
Crow Brawler POISON MECHANIC
When one of Crow’s daggers connects, it doesn’t just deal its listed damage. It applies a poison stack that ticks damage over a short duration, and more critically, it completely blocks the target’s health regeneration for the duration of that tick cycle. Hit them again before the timer expires? The clock resets.
In practical terms, this means a Crow who lands even grazing hits in a sustained chase doesn’t need to out-damage his target. He just needs to not miss entirely. A Mortis who dashes in at half health and expects to regen behind a wall? He’s going to find that his health bar isn’t moving — and Crow’s secondary poison ticks are quietly finishing the job.
The anti-regen component is especially punishing against:
Brawlers with passive regen bonuses — Ash’s rage-regen, Rosa’s healing with gadget, any HP-stacked brawler running Bandage Star Drop gear. The moment you tag one of these, their survivability toolkit collapses. Their entire defensive identity assumes they can outlast short trades. Crow doesn’t allow short trades. Every trade is a long trade when poison is running.
High-health bruisers trying to play the volume game — Frank, Jacky, Bull. These brawlers rely on soaking damage and regenerating between exchanges. Crow’s poison converts their strength (big health pool) into a liability (more HP that isn’t regenerating while they wait behind a wall).
The Dagger Spread — Range vs. Impact
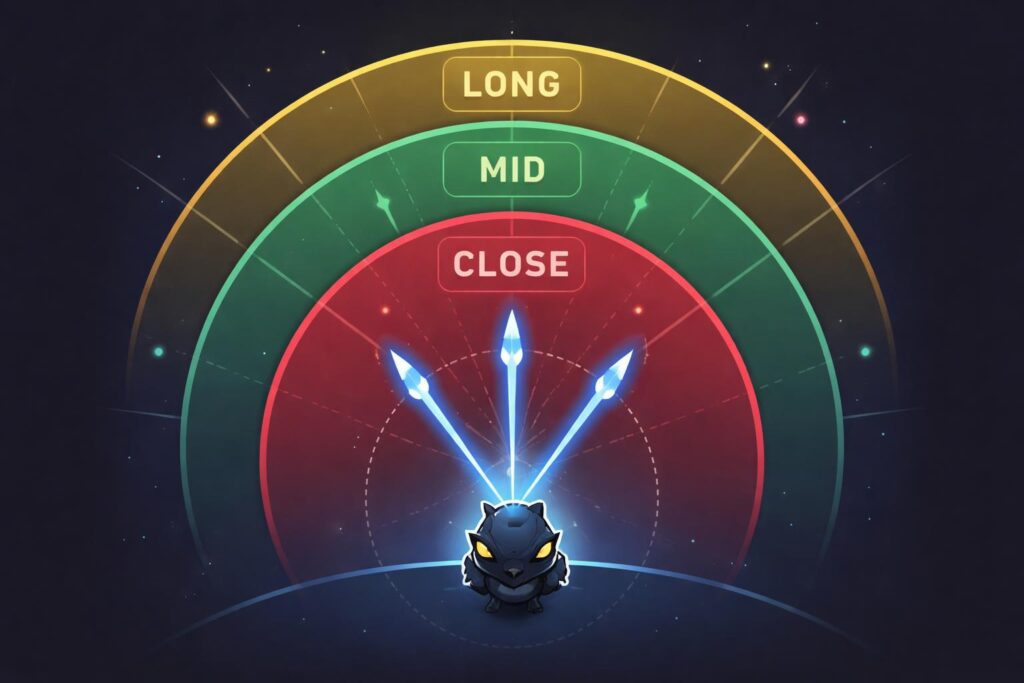
Crow fires a spread of three daggers per attack. Here’s what most new players get wrong: they think you want to be close to guarantee all three hit. Partially true, but there’s a sweet spot that experienced Crow players abuse constantly.
Too Close (Under 3 tiles): The spread is so tight that you’re essentially firing one wide dagger. You’ll hit all three on large targets, but against standard-sized brawlers, you’re also in melee range — which is where assassins die if they overstay. This is the range of desperation, not dominance.
Sweet Spot (4–6 tiles): The spread at this range is wide enough to catch dodge-steps and strafe movements, but tight enough that a non-moving target eats two or even all three daggers. This is your primary engagement range. Land two daggers at this distance and poison is confirmed regardless. This is where Crow is designed to operate.
Long Range (7+ tiles): You’re banking on enemy positioning mistakes. Use this for applying poison to start the attrition clock before you commit — not as a primary damage source. One dagger landing at long range is enough to deny regen while you reposition and wait for a better window.
Practical Drill: In your next Showdown session, consciously count your dagger hits per attack. If you’re averaging below 1.5 hits per shot at medium range, you’re either too far out or chasing too erratically. Crow’s damage per shot with all three landing is devastating; your job is to manufacture those scenarios through smart positioning, not luck.
Crow Brawler Loadout Analysis
Gadgets: Slowing Toxin vs. Defense Booster
Slowing Toxin activates the slow effect on all currently poisoned enemies — no Super required. This is Crow’s chase-closer and his primary dueling tool. In a 1v1 scenario where your Super is on cooldown, Slowing Toxin turns a poison tag into a near-certain kill. The target’s movement speed drops enough that your follow-up daggers become extremely high-accuracy shots against an opponent who suddenly can’t create distance.
In 3v3 modes, this gadget creates something extraordinary: you essentially get a mini-Super on demand. Tag a Gem carrier, Slowing Toxin, and they’re either dropping gems or burning through their team’s resources to save them. The information pressure this creates — opponents always aware that Slowing Toxin could be coming — changes how they play every single exchange against you.
Defense Booster gives Crow a temporary shield. Here’s the assessment: this gadget exists for one specific scenario — you’re playing against a brawler whose burst window kills you before poison matters. Against Kenji, Maisie, or a Draco who’s already in your face, Defense Booster absorbs the burst that would otherwise one-cycle you and lets your poison do the cleanup work instead.
The Ruling: Slowing Toxin is the default in 90% of lobbies. Run Defense Booster only if your specific map and mode has you in forced close-range fights where shield absorption is the difference between survival and deletion. Showdown with walls? Slowing Toxin. Open-lane Gem Grab where a Kenji is diving you every fight? Consider the swap. When in doubt, slow wins.
Star Powers: Extra Toxic vs. Carrion Crow — The Math
Extra Toxic reduces all poisoned enemies’ damage output by a flat percentage. In the 2026 meta, this reduction sits at roughly 10% per poisoned target. That number sounds modest until you run the game-sense math:
Against a brawler dealing 2,000 damage per hit, Extra Toxic effectively adds approximately 200 hit points to your effective health per exchange. Over five attacks in a sustained fight, that’s 1,000 effective HP absorbed without touching your actual health pool. For a brawler with Crow’s health pool, that margin is the difference between surviving a Shelly Super burst or evaporating in one rotation.
More importantly, Extra Toxic incentivizes extended skirmishing. The longer you kite and reapply poison, the longer the debuff is active, the more damage reduction you’re banking on. It rewards the precise, controlled Crow playstyle — the one that wins games at high trophies by grinding opponents down rather than gambling on single dive exchanges.
Carrion Crow increases Crow’s damage significantly against targets below a certain HP threshold — approximately +30% damage on low-health targets. This is a finisher star power. It rewards aggressive plays, diving wounded targets, and punishes opponents who try to retreat at low HP. It synergizes with the natural arc of a Crow fight: poison them down, watch their HP drop, cash out with Carrion Crow amplified shots.
When does each win?
Extra Toxic wins in survivability-focused maps, longer fights, and team modes where sustained pressure matters more than instant kill confirmation. It makes Crow substantially harder to duel and extends his effective engagement window considerably.
Carrion Crow wins in Showdown, in chaotic 3v3 environments where fights end in two seconds, and when you’re confident enough in your positioning that you’ll survive long enough to consistently access low-HP targets.
The high-trophy ruling: Extra Toxic is the mechanically superior star power because it compounds with sustained pressure and keeps Crow alive through the fights that matter. Carrion Crow has a higher floor in chaotic lobbies where you don’t control the pace. Know which game you’re playing before you lock in.
Hypercharge — ‘Utility Knife’ Strategic Breakdown

Crow’s Hypercharge supercharges his Super so that the scattered daggers return to him in a secondary arc after the initial spread, effectively doubling the dagger coverage of a single Super activation while granting the standard Hypercharge stat bonuses during the window.
This is not a press-button-win mechanic. Here’s how it’s actually deployed at the top level:
Optimal Activation Timing: Don’t pop Hypercharge the moment you have it. The value scales exponentially with targets hit. A Hypercharged Super on one isolated enemy is barely better than a standard Super. A Hypercharged Super on a three-enemy cluster in a Gem Grab lane is a fight-ending event. In Showdown, hold it until the circle forces enemies into a chokepoint where the return arc has nowhere to miss.
The Return Arc Mindread: Experienced Crow players aim their Hypercharged Super not at where enemies are, but where they will retreat to. The initial daggers push enemies backward. The return arc punishes the retreat path. If you read the escape vector correctly — and against predictable opponents you always can — a Hypercharged Super becomes a near-certain kill on anything that isn’t tank-tier health.
Charging It Efficiently: Crow builds Super through consistent dagger application. Every DoT tick contributes to Super charge. Keep poison on multiple enemies simultaneously in team modes — a disciplined Crow who maintains poison on two or three enemies in a Gem Grab match will see significantly faster Hypercharge cycling than one who fights in isolated 1v1 duels. Spread the poison. Charge faster. Control more.
Crow Game Modes
Showdown Crow operates on a simple philosophy: you are never the aggressor until the math is in your favor. Every engagement should be preceded by a poison tag from safe range, a brief retreat behind cover, and an approach only after the opponent has eaten one or two tick cycles and their regen has been offline for several seconds.
Survival Positioning in the Early Game: Hug the map’s exterior walls and move perpendicular to enemy clusters. Your goal in the first 90 seconds is not kills — it’s Super charge and poison application on as many targets as possible. Tag anyone you can safely reach, keep moving, and let the attrition clock work while you stay clean.
The Zone Transition: When the toxic cloud starts contracting, this is Crow’s harvest window. Brawlers are forced into predictable movement paths. Anticipate where opponents will funnel and position yourself ahead of their trajectory with a charged Super. A well-placed Super into a constricting zone doesn’t need to confirm a kill — it panics enemies into each other’s fire and forces positioning mistakes that you can capitalize on.
Health Pool Management: Never dive an opponent at full health unless you have a Super charged and their health is already below 75%. Crow’s health pool punishes recklessness in ways that feel unfair until you understand his design intent. The “hit twice and run” rhythm — two attacks, side-step, reposition, repeat — is not cautious play. It is the correct play. The opponents who counter Crow in Showdown are the ones who bait this rhythm and punish the third attack because you stayed a beat too long and telegraphed your approach.
3v3 Modes — Lane Control and Super Cycling
Gem Grab: Crow’s role is the control lane, not the gem lane. Position yourself opposite the enemy’s most dangerous threatening brawler and keep them poisoned and pressured at all times. You don’t want the gems — you want the enemy collector afraid to push. Your Super should be used for zone denial: drop it between the mine and the enemy base when you’re up in gems to deter the push, not for assassination attempts that leave your lane unguarded and gift the enemy a free gem run.
Super cycling is the discipline that separates competent Crow players from elite ones. At any point in a Gem Grab match, you should know exactly how many attacks away your Super is. Plan around that number. If you’re three attacks from Super, you don’t take a risky duel — you play safe, bank the charge, then dictate terms from a position of power.
Brawl Ball: The ball carrier is your primary target, always. A poisoned ball carrier can’t regen during the push, their damage is reduced under Extra Toxic, and a Slowing Toxin application turns their approach into a crawl that your goalkeeper can handle without burning resources. Crow in Brawl Ball isn’t scoring goals. He’s destroying the engine of the enemy’s offense before it generates enough momentum to threaten your net.
Team Synergies
For a full breakdown of every available brawler and their role classifications, the complete Brawl Stars brawlers roster is a solid reference point. Within that roster, Crow pairs exceptionally well with the following:
Crow + Surge: Surge wants enemies clustered and slowed. Crow delivers exactly that. A Slowing Toxin application or Hypercharged Super on clustered enemies is an open invitation for Surge to chain devastating shots into immobilized targets. The synergy is borderline oppressive in tight-corridor maps where enemies can’t easily escape the kill zone you’ve created together.
Crow + Pam: Pam’s healing turret and Crow’s anti-heal seem counterintuitive until you realize the combination covers their mutual weaknesses perfectly. Crow keeps enemies off Pam; Pam keeps Crow healthy enough to maintain his pressure game. In longer siege-style 3v3s, this duo has extraordinary staying power that most opponents are simply not equipped to grind through.
Crow + Gene: Gene’s Super pulls enemies out of position; Crow’s ready daggers confirm the kill before they can regroup. The one-two of a Gene pull into Crow’s waiting poison spread is a kill combo that’s extremely difficult to counter without significant peel from the enemy team.
Crow + Tara: Tara’s Super pulls enemies into a tight central cluster — which is precisely where Crow’s Hypercharged Super deals maximum damage on both the initial spread and the return arc. The combo is especially lethal in enclosed Gem Grab lanes where enemies have no wall cover to break the engagement. Two Supers fired in sequence with Tara pulling and Crow following is a coordinated team play that wins rounds outright.
Crow Skin Rankings
1. Mecha Crow — The gold standard. The mechanical redesign is completely faithful to Crow’s identity as a calculating, cold presence. The attack animations are crisper, the Super spread reads beautifully against darker maps, and the overall silhouette is immediately recognizable as elite. The sound design alone justifies the investment. If you’re committing to one Crow skin long-term, this is the one.
2. Phoenix Crow — Visually spectacular in ways that occasionally border on flashy for flashy’s sake. The flame trail on the Super is genuinely among the best Super animations in the game, and the color profile is aggressive and distinctive on any map. Docks points for being slightly harder to track your own dagger spread against visually busy backgrounds — a real consideration in competitive play where split-second dagger reads matter.
3. Captain Crow — Respectable thematic execution with clearly high production value, but ultimately a lateral step from base Crow rather than a full reimagining of his visual identity. Strong choice if the nautical aesthetic resonates personally, but it earns bronze here for visual impact relative to the competition. The skin doesn’t make you feel like the Boss of Bosses the way Mecha does.
Crow 3 Rules to Follow
Golden Rule #1: Poison Before Commitment
A 500-trophy Crow dives. A 1250-trophy Crow poisons first.
Never enter a fight without landing at least one dagger from safe range before committing to the engage. That single tag denies regen, starts the damage clock, and gives you critical information about the enemy’s reaction pattern. Do they juke away? Do they push? Their response tells you whether the dive is profitable or a trap. Commit only after you’ve tagged them and read their response. Never before.
Golden Rule #2: Your Super Is Terrain, Not Just Damage
A 500-trophy Crow uses Super to kill. A 1250-trophy Crow uses Super to shape the battlefield.
The scattered daggers from Crow’s Super linger as psychological terrain — opponents don’t want to walk through them and they make split-second decisions to avoid them. Use this. Fire your Super not into enemies, but into the space they want to use — their escape route, their flank path, the corner they’re retreating to. When enemies play around your Super daggers rather than through them, you’ve already won the positioning exchange without needing a kill confirmation. Terrain control is invisible damage.
Golden Rule #3: Trophy Pressure Is a Stat
A 500-trophy Crow plays their own game. A 1250-trophy Crow makes enemies play against theirs.
At elite level, Crow’s most powerful tool is what opponents do to avoid being poisoned. They burn gadgets preemptively. They over-retreat from advantageous positions. They avoid optimal map placement because the lingering threat of sustained poison is psychologically punishing in ways that no other brawler replicates. Cultivate this by being consistent and relentless in your pressure — the more reliable your harassment, the more mental real estate you occupy in your opponents’ decision-making. Make them afraid of your presence before you even engage. That fear is a stat that doesn’t show up on the damage ticker, but it wins more games than any of the ones that do.
The crow doesn’t chase. He doesn’t need to. He just makes sure you can’t outrun what he’s already put inside you.
— Play the long game. Be the poison.
FAQs
Still have questions? The daggers have all the answers. Go play.