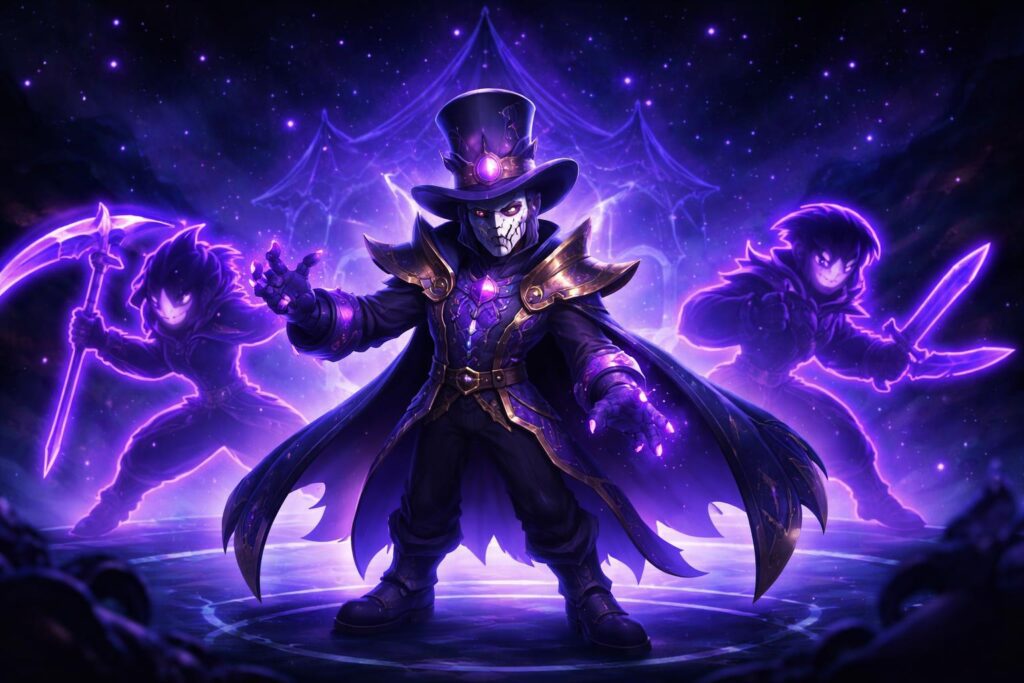
“He performed his last act under the Big Top — then vanished between the stars. Now he returns as a shadow of everything the Starr Circus ever was.”
— In-Game Lore, Starr Road to 100 Event
Sirius is not just a number. As the 100th Brawler in Brawl Stars history, he is a milestone character — the “Exile of Starr Circus” — a performer who mastered the art of cosmic illusion and was ultimately cast out for wielding power beyond the showman’s code. His design philosophy is rooted in duality and deception: he does not fight with raw strength but by turning enemies’ own power against them.
His classification as an Ultra-Legendary Controller makes him one of the rarest brawler archetypes in the game. Controllers occupy the zone-denial and map-presence tier, but Sirius elevates this with an entirely new mechanic: the Shadow System — autonomous clones of enemy brawlers that fight under his command.
Meta Disruption Index
Upon release, Sirius immediately restructured the competitive landscape. His ability to mirror top-meta brawlers effectively doubles the value of those picks — against him or alongside him. Below is a snapshot of his immediate meta impact:
🔺 High-Threat Brawlers Now Risky to Play
🪄 Controller Meta Elevated
⚡ Zone Denial + Clone Pressure = New Win Condition
⭐ Highest Skill Ceiling of Any Controller
✅ Viable in 6+ Game Modes
⚠️
Meta Note: Sirius single-handedly devalued aggressive, high-damage brawlers in open-lane maps. Teams running Kenji, Maisie, or Buzz now risk having their own champion summoned against them mid-fight. Competitive draft strategy must now account for “Shadow Risk” when picking.
The Starr Road to 100 event — requiring 99 wins to unlock him — is intentionally designed as a gauntlet. Sirius is the reward for consistent, disciplined play across all modes. Those who grind smart, not just hard, will claim him first.
The 99-win requirement is substantial, but it rewards strategic mode selection over brute-force play. Not all wins are created equal — some modes offer faster match timers, more controllable outcomes, and higher personal win-rate potential than others. Use the tier list below to build your grinding schedule.
🥊 Brawl Ball
S-TIER
Fastest average match length (sub-4 minutes). High carry potential — one skilled player can consistently clutch games. Objectives are clear and repeatable.
Best Comp: Sirius (post-unlock) · Mortis · Belle · Juju
💎 Gem Grab
S-TIER
Consistent win conditions, strong team coordination rewards. Mid-lane control = win. Shadow clones thrive at the gem mine chokepoint. Pre-unlock, use dominant lane controllers.
Best Comp: Sirius · Frank · Piper
🏹 Bounty
A-TIER
Excellent for high-skill players. Single-target control and careful positioning leads to dominant win streaks. Lower carry variance — only play if you’re confident.
Best Comp: Sirius · Brock · Tick
🗺️ Heist
A-TIER
Shorter game clock. Aggro-push comps close matches in 2–3 minutes. Shadow clones on tank brawlers (Bull, Ash) can melt the safe instantly.
Best Comp: Sirius · Bull · Dynamike
🏖️ Hot Zone
A-TIER
Zone-hold mechanics synergize perfectly with Sirius’s controller archetype. One good shadow can hold a zone solo while the real team advances.
Best Comp: Sirius · Sandy · Gale
💀 Solo Showdown
C-TIER
Avoid for grinding. High variance, long games, and shadow utility is diminished in solo fights. Use only if you’re exceptionally comfortable with 1v1 mechanics.
Note: RNG-dependent. Not recommended for sprint.
Sprint Methodology: The 3-Stack Protocol
Step 1 — Mode Lock: Commit exclusively to Brawl Ball + Gem Grab for the first 60 wins. These modes have the highest win-rate predictability for disciplined players.
Step 2 — Brawler Selection Pre-Unlock: Use your current best-ranked brawler in those modes. Efficiency > experimentation. Don’t swap brawlers mid-grind unless tilting. Recommended brawlers for the sprint: Mortis, Juju, Sandy, Belle, Frank.
Step 3 — 3-Stack Priority: Duo or Trio queue whenever possible. Coordinated teams have measurably higher win rates (est. +15–25% over solo queue in Gem Grab). Use voice comms. Designate a caller.
Step 4 — Tilt Protocol: If you lose 3 consecutive matches, switch modes. Mental freshness is a genuine competitive variable. A 30-minute break resets performance more than grinding through a loss streak.
💡
Pro Tip: Track your win rate per mode in a simple spreadsheet. If your Gem Grab win rate is below 55%, switch modes immediately — you are losing time, not gaining wins. Win-rate awareness is the single biggest efficiency multiplier in the sprint.
All values measured at Level 11 with no gear bonuses. Shadow statistics scale based on the mirrored brawler’s base Level 11 stats at time of summoning.
| Category |
Stat |
Value |
Notes |
| ⚙️ Base Stats |
| Health |
HP Pool |
7,400 |
Above-average for a Controller; survives one full burst combo from most Assassins |
| Movement Speed |
Tiles/sec |
720 (Normal) |
Standard controller movement; no innate speed boost |
| Reload Speed |
Full reload |
1.8s (per ammo) |
3 ammo slots; full reload at ~5.4s — manage ammo carefully |
| ⚡ Attack — Binary Pulse |
| Damage |
Per shot |
1,680 |
Dual-beam attack; both beams hit = 3,360 total damage per charge |
| Range |
Tiles |
8.67 tiles |
Mid-range; outranges most Tanks, slightly outranged by Snipers |
| Beam Width |
Hitbox |
Wide (2 tiles) |
Generous hitbox makes landing both beams consistent at mid-range |
| 👤 Shadow System — Clone Mechanics |
| Shadow HP |
% of original |
55% HP |
E.g., a 12,000 HP brawler produces a 6,600 HP Shadow — still tanky |
| Shadow Damage |
% of original |
75% DMG |
Three-quarter damage output; extremely threatening against squishies |
| Shadow Decay Rate |
Duration |
8s (base) |
Extends to 11s with “Eclipse Field” Star Power; Hypercharge removes decay cap |
| Max Active Shadows |
Simultaneous |
2 |
Increases to 3 during Hypercharge state |
| Shadow Targeting |
Logic |
AI-controlled |
Attacks nearest visible enemy; cannot be manually directed |
📐
Key Insight: The 75% damage scaling on Shadows means that cloning a brawler with 5,000+ DPS creates a Shadow that outputs ~3,750 DPS autonomously. Combined with Sirius’s own attack, this is effectively two brawlers’ worth of sustained damage in a single Controller slot — unprecedented in the current meta.
Sirius’s kit has meaningful build diversity, but optimal play converges on a specific configuration in ranked and competitive settings. Below is a full breakdown of every kit component with ratings and competitive verdicts.
⚡
Gadget 01
Phantom Shift
★★★★★
Instantly teleports Sirius to the location of his active Shadow for 1.2 seconds, swapping positions. This creates near-unmatched repositioning utility — escape ganks, reset position, or teleport aggressively through walls. The 1.2s invincibility window during the swap is critical in burst-meta environments.
✅ RECOMMENDED
💀
Gadget 02
Void Collapse
★★★★★
Detonates all active Shadows simultaneously, dealing 1,200 area damage around each Shadow’s position. High burst potential in clustered team fights, but sacrifices the sustained Shadow presence that defines Sirius’s win condition. Situationally strong in Heist (safe detonation).
⚠️ SITUATIONAL
🌑
Star Power 01
Eclipse Field
★★★★★
Extends Shadow duration from 8s to 11s and increases Shadow HP by an additional 10%. Three extra seconds of Shadow presence is enormous in a game where fights are decided in 5–8 second windows. This is the highest DPS-uptime Star Power in Sirius’s kit and the clear pick for 95% of maps.
✅ RECOMMENDED
🔮
Star Power 02
Dark Resonance
★★★★★
Each time a Shadow deals damage, Sirius regenerates 150 HP. Passive sustain that scales with Shadow activity. More useful in long-duration modes (Hot Zone, Gem Grab) where being topped-up matters, but Eclipse Field’s raw Shadow uptime advantage outweighs healing in most scenarios.
⚠️ SITUATIONAL
💥
Hypercharge
“Unlimited Power!”
★★★★★
When activated, “Unlimited Power!” fundamentally changes Sirius’s combat identity for its duration. The three core effects are:
1. Shadow Cap Raised to 3: Sirius can maintain three simultaneous Shadows during Hypercharge, creating a full 4-brawler effective team presence from a single slot. In team modes like Gem Grab or Hot Zone, this borders on game-breaking.
2. Decay Removed: Shadows summoned during Hypercharge do not expire from the 8s/11s timer. They persist until killed or until Hypercharge ends. This enables permanent zone lockdown.
3. Shadow Damage Boost (+30%): Shadows deal 75% × 1.30 = ~97.5% of the original brawler’s damage during Hypercharge. Essentially a perfect mirror clone in terms of offensive output.
Strategic Priority: Build toward Hypercharge in every game. The key trigger is “summon 4 Shadows” — position aggressively in the mid-game to collect charges. Hypercharge should be used when your team has a positional advantage, not as a panic tool.
⭐ META-DEFINING
Optimal Build Summary
✅
Competitive Standard Build: Phantom Shift (Gadget) + Eclipse Field (Star Power) + “Unlimited Power!” (Hypercharge). This configuration maximizes Shadow uptime, survivability, and burst-window power — the exact profile needed for both ranked climbing and tournament play.
🤝 Best Synergy Partners
Sirius multiplies his value with brawlers who can set up Shadow opportunities (crowd control, zone denial) or benefit from the chaos Shadows create (divers, assassins). These pairings are validated in high-trophy and competitive play.
Sandy
Controller
Sand cloud conceals Sirius and his Shadows. Enemies walk into Shadow ambushes blind — a near-unavoidable combo in closed maps.
Gale
Controller
Gale’s Super pushes enemies into Shadow positioning and pins high-value targets for cloning. Exceptional zone-stacking duo.
Assassin
Dashes through lanes Sirius’s Shadows are defending. Enemies must choose between chasing Mortis or surviving the Shadow — impossible split-attention scenario.
Belle
Marksman
Super marks targets, making them prime Shadow-clone candidates. Belle’s long range protects Sirius while Shadows do frontline work.
Juju
Controller
Juju’s healing aura keeps Sirius alive during aggressive mid-positioning. Shadow uptime increases dramatically when Sirius isn’t forced to retreat for HP.
Frank
Tank
Frank Shadows are devastating — 55% of his HP is still a 7,000+ HP frontline clone. Pair Frank + Sirius in Gem Grab for a near-unkillable chokepoint.
🚫 Hard Counters (Threats to Sirius)
Sirius’s Shadow system has inherent weaknesses: Shadows can be burst-killed before they deal value, and Sirius himself has no escape tool without his Gadget charged. Brawlers who exploit these windows are priority bans in competitive.
Tank
Super shield absorbs Shadow damage entirely. Buster can push through Shadow lines uncontested while his team focuses Sirius directly.
Penny
Controller
Mortar covers the exact range where Sirius positions. Persistent splash damage kills Shadows at range without engaging Sirius directly.
Assassin
Invisibility bypasses Shadow targeting AI. Leon can locate and eliminate Sirius before Shadows can react, then disengage safely.
Buzz
Tank/Assassin
Hook range resets whenever Shadows are nearby — Buzz can Super into Sirius after tagging a Shadow, not a real brawler, negating positioning safety.
🎯 Brawlers Sirius Shuts Down
Conversely, Sirius becomes a dominant counter-pick against brawlers whose identity relies on unique mechanics or high base stats — traits that become liabilities when mirrored as Shadows.
Kenji
Legendary Assassin
Shadow Kenji retains 75% of his burst damage. Seeing a Kenji mirror is psychologically and mechanically devastating — it neutralizes the Kenji player’s entire game plan.
Maisie
Marksman
Maisie’s extreme range becomes a liability — Sirius can summon her Shadow at close-range, where her long-range attack is at maximum disadvantage.
Angelo
Marksman
Shadow Angelo fires charged shots autonomously, bringing Angelo’s burst damage into the front line where he was never designed to be. Extremely difficult to deal with.
Spike
Legendary
Shadow Spike’s area-of-effect projectiles punish tight team groupings. Enemy teams are forced to split or risk being zoned by their own Spike clone.
Legendary Assassin
Shadow Crow poisons enemies autonomously — his DoT daggers require zero skill to land as a clone. Poison stacks from Shadow Crow plus real Crow create unavoidable chip damage in any corridor.
El Primo
Tank
Shadow El Primo is one of the most tanky clones available at 55% HP (~7,700 HP shadow). Creates an unkillable frontline clone in low-HP modes.
🏆
Top 1 Closing Insight: The path to Global Top 1 with Sirius is built on one core principle — always know what Shadow you will summon before you walk into a fight. Scout the enemy team at loading screen. Identify the highest-value Shadow target. Build your positioning around acquiring that brawler as your first clone. Every subsequent decision flows from that choice. The best Sirius players don’t react to the meta — they decide what the meta looks like.