You just spent 23 hours putting together a gorgeous 1,500-piece landscape puzzle. Your back hurts, your eyes are tired, but man, does it look incredible sitting there on your dining table (or a special puzzle table). The thought of breaking it apart and stuffing it back in the box feels like a crime, right? That’s exactly how I felt last winter when I finished my first “frameable” puzzle (a vintage travel poster of the Swiss Alps, if you’re curious).
Here’s the thing about framing a puzzle – it’s not rocket science, but there are definitely some tricks that’ll save you from those “ugh, why didn’t I know that sooner” moments. After framing five puzzles myself and talking to folks at my local craft store, I’ve picked up what actually works. Let me walk you through it.
Why Bother Framing Puzzles Anywayis
But yea, before we go much farther, why do people even DO this ‘frame your puzzle game’ thing? Of course, you can always take a photo and call it good. Yet there is something satisfying about seeing your finished work on the wall. It’s like completing a marathon And receiving the medal — one is an achievement, the other evidence you actually did it.and
Plus, decent puzzles aren’t cheap these days. A quality 1,000-piece puzzle can run you anywhere from $20 to $50. That New Yorker cover puzzle I mentioned? Yeah, that was closer to the $30 mark. Framing it means I get to enjoy that investment for years instead of weeks. If you’re into puzzle games of all types, you know how satisfying completing them can be – and framing makes that satisfaction permanent.
The Prep Work Nobody Warns You About
Alright, first things first. Your jigsaw puzzle is sitting there all completed and pretty, but it’s still just a bunch of cardboard pieces pretending to be a cohesive unit. We need to fix that.
Clean It Up
This sounds obvious, but you’d be surprised. While you were hunched over that puzzle for days (weeks?), dust settled, crumbs fell, maybe your cat walked across it. Grab a soft cloth or one of those microfiber things and gently wipe the surface. Trust me on this – any gunk you leave now will be permanently sealed in once you start gluing. My first puzzle? Yeah, there’s a cat hair eternally preserved in the upper left corner. Learn from my mistakes.
Roll It Out
Here’s a trick from the pros – grab a rolling pin from your kitchen. Gently roll it over the entire puzzle surface. This pushes all the pieces flush together and helps you spot any gaps or pieces that aren’t sitting quite right. Think of it like ironing out wrinkles, except way more satisfying.
Measure Everything (No, Really, Everything)
This is where people mess up. They look at the box, see “19.25 x 26.625 inches,” and order a frame. Then the frame arrives and… the puzzle doesn’t fit. Puzzle dimensions on boxes are suggestions at best. Sometimes pieces compress during shipping, sometimes they expand slightly when you assemble them.
Get a ruler or tape measure. Measure the actual width and height of your completed puzzle. Write these numbers down. Put them somewhere you won’t lose them. You’ll need these exact measurements for picking out a frame.
How to Glue a puzzle
Now for the main event. You’ve got options here, and honestly, they all work if you do them right.
Option 1: Puzzle-Specific Glue
There are glues made specifically for puzzles – brands like Mod Podge, Springbok Puzzle Saver, and others. These are designed to dry clear and not warp the cardboard. I’ve used Mod Podge for three of my puzzles, and it works great.
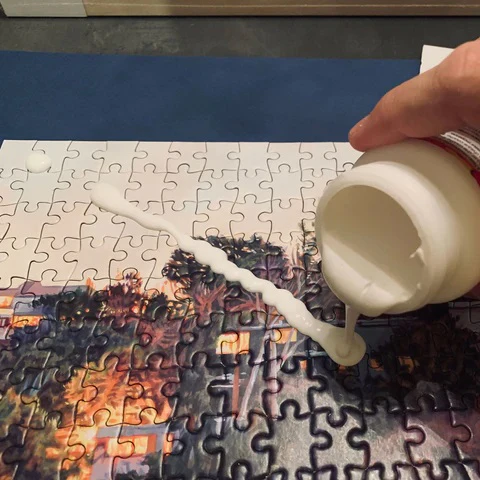
Here’s how to do it:
- Slide wax paper or parchment paper under your entire puzzle first (seriously, don’t skip this unless you want your puzzle permanently bonded to your puzzle table)
- Pour some glue onto the puzzle surface
- Use a foam brush, old credit card, or the spreader that sometimes comes with the glue to spread it evenly
- Work from the center outward
- Make sure you get glue into all the cracks between pieces
- Let it dry completely (usually 2-4 hours, but I always wait overnight)
Some people swear by gluing the back too. I did this with my second puzzle because I was paranoid, but honestly? If you’re mounting it on foam board (which we’ll get to), front-only glue is usually fine.
Option 2: Adhesive Sheets
These are basically giant stickers you apply to the back of your puzzle. They’re more expensive per puzzle (around $8-12 per sheet), but they’re faster and less messy.
The tricky part is flipping your puzzle over without it falling apart. Here’s the method: sandwich your puzzle between two pieces of stiff cardboard, carefully flip the whole thing, remove the top piece of cardboard, apply the adhesive sheet, flip it back. It sounds scary, but if you’re gentle and keep the cardboard tight against the puzzle, it works.
Common Gluing Mistakes
Let me save you some heartache. Don’t use too much glue – more isn’t better here. I went overboard on my Alps puzzle and it took three days to dry instead of one. Also, don’t use a brush with bristles. They leave marks. Foam brushes or spreaders are your friends.
Oh, and if your puzzle starts to curl while drying? Don’t panic. Let it dry completely, flip it over, apply glue to the back, and let that dry. The two layers pulling in opposite directions usually flatten things out.
Mounting Your Puzzle (Making It Frame-Ready)
Once your puzzle is glued and dry, you need to mount it on something rigid. This step is what keeps your puzzle from warping or pieces falling out years down the line.
| Mounting Material | Cost | Pros | Cons | Best For |
|---|---|---|---|---|
| Foam Board | $5-15 | Lightweight, rigid, easy to cut | Adds thickness | Most standard puzzles |
| Mat Board | $8-20 | Archival quality, looks professional | More expensive | Puzzles you want to last decades |
| Cardboard | $0-5 | Cheap, readily available | Can warp over time | Temporary displays or budget projects |
| Wax/Parchment Paper | $3-8 | Ultra-thin, doesn’t add bulk | Less support, can shift | Small puzzles or temporary framing |
Here’s what I do: cut foam board to be slightly smaller than the puzzle (like 1/8 inch smaller all around). Apply a thin layer of puzzle glue to the back of the puzzle (or use spray adhesive), carefully position the foam board, press it down, and weight it with books while it dries.
Some craft stores will do “dry mounting” for you using heat-activated adhesive. This runs about $15 and gives you a super-professional result. I’ve had it done once – worth it if you’re framing something really special.
How I Pick the Right Frame for a Jigsaw Puzzle
This is where things get fun. You’ve got your glued, mounted puzzle ready to go. Now you need a home for it.
Frame Depth Matters
Regular photo frames are usually too shallow for puzzles. Most standard cardboard puzzles are about 1/16 to 1/8 inch thick. Add mounting material (another 1/8 to 1/4 inch), and you’re looking at a total thickness of around 1/4 inch.
Check the frame specs before buying. Shadow box frames are designed for thicker items and they’re perfect for puzzles. Some “puzzle-specific” frames exist too, but honestly, any frame that can accommodate the thickness will work.
To Glass or Not to Glass
This is personal preference territory. Glass (or acrylic) protects your puzzle from dust, fingerprints, and that one friend who touches everything. But it adds weight and can cause glare depending on where you hang it.
I’ve framed puzzles both ways. The one without glass sits in my office where lighting is consistent. The ones with acrylic are in my living room where they get more handling (kids visiting, etc.). Acrylic is lighter than glass and won’t shatter if it falls, which is nice.
Matting Decisions
Adding a mat around your puzzle creates a border between the puzzle edge and the frame. It looks professional and gives the eye somewhere to rest. Mats typically add 2-3.5 inches on each side.
The downside? Your frame needs to be bigger to accommodate both the puzzle and the mat. A 1000-piece puzzle might be 20×27 inches. Add a 3-inch mat all around, and now you need a 26×33 inch frame. That gets pricey fast.
For my first few puzzles, I went edge-to-edge (no mat). Simpler, cheaper, still looks great. My fancier puzzles got mats. Do what fits your budget and aesthetic.
Frame Styles and Where to Buy
Budget-Friendly Options
Big box craft stores like Michaels or Hobby Lobby have sales all the time. I’ve gotten frames there for 40-50% off regularly. Amazon also has decent options, especially if you search for “puzzle frame” plus your specific dimensions.
Mid-Range Custom Framing
Websites like Frame It Easy, Level Frames, and others let you input custom dimensions and pick from various styles. You’ll pay more (usually $60-150 depending on size), but you get exactly what you need.
Comparison Shopping Tips
| Where to Buy | Average Cost (20×27 frame) | Customization | Delivery Time | Best For |
|---|---|---|---|---|
| Michaels/Hobby Lobby | $30-60 (with sales) | Limited to stock sizes | Same day/Next day | Standard puzzle sizes |
| Amazon | $25-70 | Moderate selection | 2-7 days | Price-conscious shoppers |
| Custom Frame Sites | $80-150 | Highly customizable | 7-14 days | Non-standard sizes |
| Local Frame Shop | $100-250+ | Completely custom | 1-3 weeks | Premium quality, unique puzzles |
Putting It All Together
You’ve got your glued and mounted puzzle. You’ve got your frame. Now for the moment of truth.
Most frames come with backing hardware (clips, tabs, or turn-buttons). Here’s the general process:
- Remove the frame backing
- Clean the glass/acrylic if there is any
- Place your puzzle inside (make sure it’s centered)
- Replace the backing and secure it
- Attach hanging hardware if it’s not pre-installed
Some frames have the glass attached to the frame itself, which can be annoying. If yours is like that, slide your puzzle in from the back and hope for the best. This is why I prefer frames where the glass is separate.
Hanging Your Framed Puzzle
Puzzles get heavy. That 1000-piece puzzle with glass, backing, and a wood frame? You’re looking at 5-8 pounds easily. Larger ones can hit 10-15 pounds.
Standard picture hanging methods work, but pay attention to weight limits:
- Nails are fine for smaller puzzles (under 5 lbs)
- Wall anchors or toggle bolts for anything heavier
- 3M Command picture hanging strips work surprisingly well and don’t require holes (just make sure you get ones rated for the weight)
I use Command strips for most of mine. Makes it easy to swap out puzzles seasonally without putting new holes in the wall every time.
Different Approaches for Different Puzzle Types
Standard Rectangular Puzzles
Everything I’ve described above applies. These are the easiest to frame because frames are designed for rectangular shapes.
Shaped Puzzles
Got one of those car-shaped or circular puzzles? These are trickier. You’ll likely need a custom frame or a much larger standard frame with lots of negative space around the puzzle.
The float mounting method works great here – center your shaped puzzle on a larger mat board, use double-sided tape to secure it, then frame the whole thing. Gives you lots of visual interest with the white space.
Wooden Puzzles
These are thicker (often 1/4 inch or more) and heavier. You definitely need a deep frame, and I’d recommend gluing the back as well as the front for extra security. Mounting on foam board is pretty much mandatory.
Giant Puzzles (2000+ pieces)
I haven’t tackled one of these myself yet, but from what I’ve learned, the process is the same, just… more. More glue, bigger mounting board, heavier frame, more expensive everything. Some people do these in sections if the finished size is truly massive. If you’re working on something this ambitious, you’ve got the patience of someone who probably also enjoys long-form strategy games where planning and patience pay off.
Common Problems You May Have
My Puzzle Warped After Gluing
This happens when puzzle glue is applied unevenly or one side dries faster than the other. Fix: glue the opposite side and let it balance out. Prevention: use thin, even coats of glue and let it dry flat.
Pieces Are Falling Out
You didn’t use enough glue, or it didn’t get into all the cracks. If it’s just a couple pieces and you haven’t mounted it yet, carefully apply more glue to those specific areas with a toothpick.
The Frame Is Too Small/Too Big
Measure twice, order once. If your frame is slightly too big, you can add thicker matting. Too small? You might need to trim the foam board mounting very carefully, but honestly, it’s usually easier to just get the right size frame.
Puzzle Glue Soaked Through to My Table
This is why we use wax paper, folks. If it happens, let it dry completely, then carefully peel the wax paper off the back. Some residue might stick – you can usually rub it off with your fingers once it’s dry.
Creative Display Ideas Beyond Basic Framing
Not everything needs to be a standard frame on a wall. Here are some variations:
- Puzzle galleries: Frame multiple smaller puzzles (500-750 pieces) and hang them together gallery-style
- Floating shelves: Lean framed puzzles on decorative shelves instead of hanging them
- Seasonal rotations: I swap my living room puzzle four times a year to match the seasons
- Kids’ room decor: Frame puzzles they completed themselves – huge confidence boost
- Gift giving: Framed puzzles make surprisingly thoughtful gifts if you know what image someone would love
Cost Breakdown (What to Actually Expect to Spend)
Let’s be real about money. Here’s what I spent on my last puzzle framing project (a 1000-piece puzzle):
- Puzzle: $28
- Mod Podge glue: $7
- Foam brush: $2 (pack of 10)
- Foam board: $8
- Frame (20×27, on sale): $45
- Acrylic sheet (came with frame): included
- Total: $90
You can definitely do it cheaper ($50-60 if you go budget on everything) or way more expensive ($200+ with custom framing). The sweet spot for most people seems to be around $70-100 for a quality result.
How Long Does This Whole Process Take
From completed puzzle to framed and on the wall:
- Cleaning and prep: 15 minutes
- Gluing: 30 minutes (plus 4-24 hours drying time)
- Mounting: 30 minutes (plus 2-4 hours drying time)
- Frame assembly: 15 minutes
- Hanging: 10 minutes
So active time? Maybe 2 hours. With drying time included, plan on this being a 2-3 day project if you’re doing it right and not rushing.
Tips from Someone Who’s Made Every Mistake
After framing five puzzles (and messing up aspects of the first three), here’s what I wish someone had told me:
Start with a cheaper puzzle. Don’t make your first framing project that $60 limited edition puzzle. Get a $15 clearance one and practice.
The box measurements lie. Always measure your actual completed puzzle.
Foam brushes beat regular brushes every time. They’re cheap, they don’t leave marks, and you can throw them away when you’re done.
Wait for sales on frames. Craft stores have 40-50% off sales constantly. Sign up for emails, be patient, save money.
Less glue is usually better. You want enough to seal the pieces together, not enough to create a swimming pool.
Wax paper is your friend. It’s prevented so many disasters for me.
When to Just Pay Someone Else to Do It
Look, DIY is great, but sometimes it makes sense to outsource. Consider professional framing if:
- Your puzzle is super expensive or sentimental
- You have a weirdly-shaped puzzle
- Your puzzle is massive (3000+ pieces)
- You’re all thumbs and know you’ll mess it up
- You value your time over the money saved
Professional puzzle framing usually runs $80-200 depending on size and options. They’ll do everything – gluing, mounting, framing, the works. Some people think it’s worth it just for the peace of mind.
Keeping Your Framed Puzzle Looking Good
Once it’s up on the wall, maintain it:
- Dust the glass/acrylic regularly
- Keep it out of direct sunlight (puzzle colors can fade)
- If you notice the puzzle shifting inside the frame, it wasn’t mounted well – might need to redo it
- Check hanging hardware yearly, especially for heavy frames
According to research from the Smithsonian’s preservation department, properly framed and protected puzzles can last 50+ years without significant deterioration. That New Yorker puzzle I framed? My grandkids might enjoy it someday.
Yes, It’s Worth It
Framing a puzzle takes effort. It costs money. It requires patience (which, let’s be honest, if you completed the puzzle, you already have). But there’s something really satisfying about turning hours of work into a permanent piece of art for your home.
My Swiss Alps puzzle hangs in my office. Every time I look at it during a frustrating work call, I remember those quiet winter evenings piecing it together. That’s worth way more than the $90 I spent getting it framed.
Whether you’re framing puzzle games for yourself or planning to gift one, the process doesn’t have to be intimidating. Take your time, follow the steps, maybe practice on a cheaper puzzle first, and you’ll end up with something you’re proud to display. And hey, if you mess up? That’s just an excuse to do another puzzle and try again.
Now if you’ll excuse me, I have a 1500-piece puzzle of the Japanese countryside that’s been sitting on my puzzle board for three weeks. Time to go find my wax paper and Mod Podge.